Laptop computer problems can cause by internal disorders of the physical connectors. The common victims are network or modem ports, which may be detached within the case or the breaking of the power connector solder joint of the board. Such problems are very dangerous because here you need to open up the body of the notebook for soldering. Be careful to use a decent solder sucker for quick clean up.
Laptop problems are often caused by virus attacks. In this case they behave very strangely. One common symptom is the screen display goes off though the laptop is running. This can be due to graphic display driver files affected by virus or sometimes deleted by anti virus considering it to be a strange file. Re-starting the laptop in Safe Mode and re-installing the display drivers will repair this problem.
If you are not tech savvy, my personal advice is to hire a professional technician for Laptop computer repair unless it is software related problem. It is always better if you can contact s Laptop Repair Company authorized by the Laptop manufacturer.
Repair laptop display problems
If there is complete display failure, first of all check the status of the power. If you were able to hear the fan of your laptop and now it isn’t, that means it’s a main board or power failure, not a video failure.
Another common practice in laptop computer repair is to connect a normal computer monitor with a standard VGA connector, if your laptop does not light up the external monitor means either the internal video adapter or the motherboard has failed. In case the external monitor is working then your laptop video subsystem has a problem and need to investigate further.
If there is a display problem in your laptop computer and the number of dead spots or columns or whole row increases slowly on the screen, it indicates that the assembly of actual LCD is bad. In the same way, if the screen flickers it is probably the failure of backlight or inverter.
How to solve low memory problems?
Normally this warning message shows when you run many programs same time than the RAM installed on your computer is designed to support. Your can solve this problem by increasing the system paging file size also called as virtual memory. Using this virtual memory windows moving information to and from the paging file for fast processing. This will free up enough RAM for other programs to run properly.
To increase the system page file follow the give path:
Control Panel > System > Advanced > Click on Settings (Under Performance) > Advanced > Change
Here under Drive (Volume label), you have option to select any of your hard disk drive, but the best choice is, select any drive other than C drive for virtual memory.
Set the double Initial & Maximum Size of your Virtual Memory. Here set initial size 700 MB and maximum size up to 1000MB; you can change this size according to the free space available on your hard drive.
Top Viruses 2009
Virus Name & Risk
1. Net-Worm.Win32.Kido.ih – Downloads computer files and blocks access to many legit websites.
2. Virus.Win32.Sality.aa – Installs itself and hides in program or data files. Blocks many websites, deletes PC files.
3. Trojan-Dropper.Win32.Flystud.ko - Keylogger tool used by hackers to break into a system and ultimately steal identity.
4. Trojan.Win32 .Autoit .ci – Tracks PC activity, including keystrokes and sends to hackers in order to steal personal info.
5. Trojan.JS.Agent.xy – Drive-by-download that has the ability to download spyware and viruses onto your PC.
6. Exploit.HTML.CodeBaseExec – Exploit that turns PCs into zombies, infecting other PCs in order to steal personal data.
Computer gets stuck starting up the operating system
1. Do you get error messages or nothing? If you do get error messages write them down.
2. When did it last work?
3. What was the last thing you did before shutting it down?
4. Did you install new software, or hardware? Did you delete any files?
5. For Mac, try starting system with extensions off (you do this by restarting while holding down "shift" key). Then turn extensions on with extension manager slowly to find problem.
6. In Windows press "F8" at start up, and try launching in "Safe Mode".
What To Do When Your Hard Drive Fails
How many times have you experienced that sickening feeling when your hard drive suddenly fails?
How many times have you experienced that your hard disk just does not boot and all the data may be gone forever?
A hard drive failure is one of the most common problems and worst nightmares faced by computer operators all over the world.
Precious data is lost either at home or in big corporate environments. What can be done in these situations?
Well, there are certain solutions that can be performed by you in order to revive your hard drive. We will talk about the solution later. First, let us discuss why a hard drive fails.
Whether the data on the hard drive can be recovered or not depends on the extent of the problem. A hard drive can be damaged due to firmware corruption, electronic failure, mechanical failure or a logical failure.
Many times your hard drive may lose data due to the combination of the above mentioned factors. A hard drive may also develop bad sectors due to which the data on those sectors is lost or becomes unreadable.
Firmware refers to the information used by the computer to interact correctly with the hard drive. If the firmware fails or becomes corrupted, then important data on the hard drive is lost.
In case of an electronic failure there maybe occur an electrical surge that can knock out the controller board on the hard drive and make it unusable.
However data can be recovered by data recovery experts who use special data recovery software. Swapping the controller board with another one can prove to be dangerous as the information on the controller board is unique to the hard drive on which it is fitted.
In comparison to electronic failure a mechanical failure can turn out to be worst as data recovery can almost become impossible.
Mechanical failure includes head crash and also read/write head failure. Head crash can occur due to physical shock, power surges and movement of the computer.
Next come the logical errors. Logical errors have nothing to do with the hardware part. Logical errors can occur due to corruption of the file system on the hard drive or improper entries in the file allocation table.
In case of hard drive failure it is vital to call the data recovery experts. In most cases, the information on the hard drive is important and you cannot bear to lose it.
The experts enhance the possibilities of hard drive recovery in the case of failure of hard drive due to software malfunction, virus attacks and other reasons mentioned above.
Data can be recovered on any type of operating system including all versions of Windows as well as Apple Macintosh, Novell, Linux, Unix and also on all types of file systems like FAT, FAT32, NTFS, NTFS5, HFS, HFS+, NWFS, EXT2 and EXT3.
The experts may take the hard drive to their workshop in order to recover the lost data and then return it to you in a few days.
Most of the data recovery experts have their own laboratories that are involved in testing the hard drives and repairing them.
Loss of data is the last thing that you as the customer would ever want. This is where the data recovery experts come into the picture.
They cannot extract only data from hard drives, but recover data also from tape drives, cds, dvds and other important storage media.
You as the consumer can take up some preventive measures like backing up all your important data at least once a week.
Windows has its own feature rich backup program. There are other backup software programs available in the market that can avert a possible disaster.
Besides the concern of recovering your data, another problem is the time it may take for an expert to help. This can be a slow and tedious process.
I recommend having a second complete computer source such as a laptop (for portability) that you can continue your work. This way you are never completely down and you can share important data between the two.
Compact Disc - Facts and Complete Do's and Donts
The maximum a floppy disk can contain is 1.44 MB. To play a game with around 200 MB you are stuck with 100 over diskettes. The CD-ROM is a revolutionary invention that allows up to 625 MB at one time. However, it is read only, which means you can't store in anything.
Buttons Fun
Although most CD-ROMs comes with only 2 buttons, do you know you can also skip, play previous track and play the next track as well with a proper combination? Check properly on your instruction manual for additional functions. You just might be surprised what it can do.
Clean Thoroughly
It is important to clean the CR-ROM at least once every month. Get a CD lens cleaner. If possible, choose one with an alcohol solution drop. This should ensure that your CD-ROM will always be able to read properly.
Clean You CDs
It is just as important to clean your CDs often. Why? Because if you have a speck of dust on the surface of one of your CDs, once spinning at high-speed in the drive, the speck of dust is enough to produce scratches on your precious CD.
Running In DOS
One of the common problems with CD-ROMs is unable to access it under DOS. This might be because the protected-mode CD-ROM driver isn't available. You'll need to add the real-mode device driver, usually included with your CD-ROM drive, in CONFIG.SYS and load MSCDEX.EXE, which is available in the Windows\Command folder. You should also make sure both files are on your startup disk.
Run List
Like those cool expensive hi-fi systems, you can customize the run list of your Audio CD, only not with the CD-ROM itself. Use Windows' CD player to customize the run list and you can have your CD running in any track order you like.
Read Ahead
The read ahead buffer is useful to speed up things. Go to Control Panel, System. Click on the Performance tab. Click on the File System... button. On the File System Properties, click on CD-ROM. Make sure you have the fullest cache. Even if you have a CD-ROM with less than Quad speed, just move ahead. You'll be surprised to find your CD-ROM running faster.
Graphic Card Troubleshooting Tips
The graphic card is one of the most important pieces of hardware in your PC. Without it, your super monitor with all the bells and whistles is just a junk box.
Make Directional Input
Most video cards come with simple frame capture programs, but you'll have to do some programming if you plan to integrate video capture with other operations on your computer, such as adding text data as an overlay or changing video-in channels on the fly. In this case you'll need good programming libraries in a language with which you are familiar for the video card. Some companies include libraries with their cards, but most charge extra. Most often libraries, when available, are for C or BASIC, and sometimes Pascal.
Choose Between 24 bit and 32 bit
For True Color mode, some graphic cards offer 24 bit while some offer 32 bit. Which is the best? When True Colour mode was first suggested, it utilizes 32 bit which was very pleasing to the eye, they realize that 24 (with less coolers) won't look much different since the human eye can only take about a certain amount of colors. On the other hand, 24 bit will run faster compared to 32 bit because it uses less colors. So if your card utilizes 24 bit, don't worry, it isn't bad.
Always Use The Latest Drivers
Yes, it is important to make sure you always have the latest drivers. The latest drivers will offer you better performance, more utilities and more compatibility (usually for DirectX or Direct3D). Take the effort to check you card manufacturer's site to look for the latest driver updates.
Change Owner of Computer
Are you going to sell your computer to someone else, and do not want to have your personal information stored on it? Well, you have plenty of other steps, but here is how you change the registered owner of the computer.
* open the registry edit (start, run, regedit)
* navigate to [HKEY_LOCAL_MACHINE\SOFTWARE\Microsoft\Windows NT] and then to [HKEY_LOCAL_MACHINE\SOFTWARE\Microsoft\CurrentVersion]
* Change the keys for RegisteredOwner and RegisteredOrganization
* open the registry edit (start, run, regedit)
* navigate to [HKEY_LOCAL_MACHINE\SOFTWARE\Microsoft\Windows NT] and then to [HKEY_LOCAL_MACHINE\SOFTWARE\Microsoft\CurrentVersion]
* Change the keys for RegisteredOwner and RegisteredOrganization
Turn off Thumbnails
This will speed up navigating folders, but you wont see little thumbnails of images. I personally like the icons, but it can slow things down.
* Control panel
* User Configuration
* Administrative Templates
* Windows Components
* Windows Explorer
* Setting turn off the display of thumbnails and only display icons.
* Control panel
* User Configuration
* Administrative Templates
* Windows Components
* Windows Explorer
* Setting turn off the display of thumbnails and only display icons.
'Open with notepad' as menu item
Always use notepad, or some other tool all the time, and just want a default 'open with' function? Easy.
* open the registry edit (start, run, regedit)
* navigate to [hkey_classes_root\*\shell\
* create a folder called 'open with XXXXX'
* create a folder called 'command'
* click on defalt
* add command, for example 'notepad.exe %1'
* open the registry edit (start, run, regedit)
* navigate to [hkey_classes_root\*\shell\
* create a folder called 'open with XXXXX'
* create a folder called 'command'
* click on defalt
* add command, for example 'notepad.exe %1'
Change Backup Size
I believe Vista allocates 300mb for backups. Want to change that setting for whatever reason? Here we go
* Open an Admin Command Prompt (right click on cmd, and select run as Administrator)
* type 'vssadmin Resize ShadowStorage /For=[DRIVE]: /On=[DEST]: /MaxSize=[SIZE]MB'
* where [DRIVE] is your main drive
* where [DEST] is destination drive
* where [SIZE] is the size to change it to.
* Open an Admin Command Prompt (right click on cmd, and select run as Administrator)
* type 'vssadmin Resize ShadowStorage /For=[DRIVE]: /On=[DEST]: /MaxSize=[SIZE]MB'
* where [DRIVE] is your main drive
* where [DEST] is destination drive
* where [SIZE] is the size to change it to.
Turn off Automatic backups
Don't want automatic backups running constantly to annoy you and make installing drivers take longer than it should? Or, just never really see yourself using it? It doesn't back up your personal files, only system files.
* Start
* Backup and Restore Center
* Create a restore point or change settings
* Uncheck next to your disk under 'Available Disk
* Start
* Backup and Restore Center
* Create a restore point or change settings
* Uncheck next to your disk under 'Available Disk
Fake WEI Score
Well, as I have mentioned a couple times on this site, your WEI is going to be used by software companies to determine whether or not you can run some software.
I am unsure how 'strict' they will be, but if they ever give you any hassles, you can just fake it.
This is easily accomplished by going to /Windows/Performance/WinSAT/DataStore
Finding the most recent .SAT file, and.. editing it.. using an administrator access enabled tool..
It's just an XML file, so it should be fairly obvious how to edit it.
Now, I do not know of any software yet, so it may be stored in another location as well, but most likely this is the main location for it to live.
This will obviously not make your computer faster in any way, but, it may allow you to run software that may otherwise stop you from being able to run (probably slowly though)
Run winsat from commandline
Windows Experience Index can be run from the commandline, and give you extra details.
* Open an Admin Command Prompt (right click on cmd, and select run as Administrator)
* type 'winsat formal'
* prints out all the details of your system's benchmarks
* saves in c:\windows\performance\WinSAT\DataStore
* .SAT files by date, XML file format.
* Open an Admin Command Prompt (right click on cmd, and select run as Administrator)
* type 'winsat formal'
* prints out all the details of your system's benchmarks
* saves in c:\windows\performance\WinSAT\DataStore
* .SAT files by date, XML file format.
Password Backup
Have a fear you will forget your password, or the administrator password. Well, back it up. I'd personally not worry about it all, but it's a feature.
Backup up login password:
* open Control Panel
* User Accounts and Family Safety
* User Accounts
* Create a password reset disk
* Follow wizard
* Insert USB stick
* Type current password
To use Backup login password:
* boot pc
* At login screen, press ok, or type in an incorrect
password
* Select reset password
* insert your flash drive/floppy disk
* Follow wizard
Turn off security center
Security center is annoying. It bothers you all the time. So, if you feel the need to disable it, change it. However, it still runs in the background.
* open security center
* choose 'change the way secirty center alerts me'
* select 'don't notify me and dont display the icon'
* open security center
* choose 'change the way secirty center alerts me'
* select 'don't notify me and dont display the icon'
Non-Activated Accounts
If you have a pirated copy of windows, or you choose not to activate, or whatever the reason, Microsoft has chosen to allow you some functionality. Check out MS knowledge base for more info
Activities that are available:
If Windows Vista is running in non-genuine reduced functionality mode, you can perform the following actions:? Use Windows Vista features
You can use most of the features that are available in Windows Vista.
Aero Glass and the Windows ReadyBoost features that are included with Windows Vista are unavailable in reduced functionality mode.
pretty much its a 'home basic' edition
The WGA program detects a blocked product key or a counterfeit product key.
The WGA program detects incorrect activation binary files or modified activation binary files.
Windows Vista is in out-of-grace reduced functionality mode.
Extend activation time
There are a lot of reasons when you just don't want to activate after 30 days. Maybe you didn't set your clock, and now after you changed it, Vista is whining. Maybe all your new hardware didn't arrive yet, and you do not want to have to mess around with getting it reactivated. Whatever the reason, Microsoft allows you to extend activation time up to 180 days!
* Open an Admin Command Prompt (right click on cmd, and select run as Administrator)
* type 'slmgr -rearm'
* now you have another 30 days, repeat until 180 days
Note: This has been noted that it may have been disabled after certain patches were applied to Vista. Please try at your own risk.
* Open an Admin Command Prompt (right click on cmd, and select run as Administrator)
* type 'slmgr -rearm'
* now you have another 30 days, repeat until 180 days
Note: This has been noted that it may have been disabled after certain patches were applied to Vista. Please try at your own risk.
Boot Configuration
Vista has a new boot config tool. Feel free to mess around with it.
* Open an Admin Command Prompt (right click on cmd, and select run as Administrator)
* type 'BCDEdit'
* Open an Admin Command Prompt (right click on cmd, and select run as Administrator)
* type 'BCDEdit'
Driver Verifier
Driver issues? This will verify all your drivers and make sure they are MS compliant. Be sure to turn it off when you are done/
* Open an Admin Command Prompt (right click on cmd, and select run as Administrator)
* type 'verifier'
* then type 'verifier /reset' to turn off.
* Open an Admin Command Prompt (right click on cmd, and select run as Administrator)
* type 'verifier'
* then type 'verifier /reset' to turn off.
See/remove drivers installed for unused devices
Just changed your hardware quite a bit, or have a lot of removable devices you use that you no longer need... and randomly have some obsession with keeping things tidy. I cannot promise you that it will speed up anything.
* Open an Admin Command Prompt (right click on cmd, and select run as Administrator)
* type 'set devmgr_show_nonpresent_devices=1'
* type 'devmgmt.msc'
* select show hidden devices
* Now you can see disabled, unused drivers and remove them.
* Open an Admin Command Prompt (right click on cmd, and select run as Administrator)
* type 'set devmgr_show_nonpresent_devices=1'
* type 'devmgmt.msc'
* select show hidden devices
* Now you can see disabled, unused drivers and remove them.
Allow other file extensions to be included in search
It is often that I do searches for text in files, like a method use in a PHP file, or maybe something in a java file. Regardless of the situation, Windows Vista has a very limited number of file extensions flagged for full text searching, which causes you to get 'no results' when you know there are some.
* Open Control panel and type in 'indexing' into the search box (or you can do this from your start menu, but many people turn it off).
* Select 'Indexing Options'
* Select Advanced Button
* Select 'File Types' Tab
* In this list you will see a list of extensions. When you click on most of them, the bottom radio button will change from 'index properties only' or 'index properties and file contents'
* Honestly, index properties only is pretty useless for what most people will use search for (i.e. really only search by date).
* Uncheck a box to have it removed from search. This can be done for a variety of extensions that honestly, you dont want in search anyway. It will actually help your results.
* Change the radio button to 'index properties and file contents' to have these file types included in your searches (should be set for word docs, etc and any other text-based files you search for)
Tweak Indexing Options for Better Performance
The indexing service is responsible for two things really: Making search boxes run super quickly (like under the control panel, and your program files) which is a blessing, as it does run very fast. It is also responsible for doing the same thing over all your files that you choose to let it index. This can be good if you do a lot of searches, or bad if you have a lot of files in these areas, but don't ever search them. Or even if you do search them, it can cause your indexing service to cause a lot of strain on your hard drive (or at least slow you down as it is hard drive intensive). I personnaly would not turn *off* Indexing services, but I would recommend disabling for everything else but the start menu/control panel, etc.
You can change the indexing locations:
* Open Control panel and type in 'indexing' into the serach box (or you can do this from your start menu, but many people turn it off).
* Select 'Indexing Options'
* Select Modify Button
* Expand the trees, and uncheck any areas you do not want indexed. It is a pain, as you get no indication which trees have subtrees checked, but the best place to start is Users/*your user name*/ and Users/Public.
System file checker
Something messed up in your Windows install? Vista has a system checker that will check your files against the install media.
* Open an Admin Command Prompt (right click on cmd, and select run as Administrator)
* type 'sfc /scannow'
* insert vista DVD
* checks against Vista DVD.
* Open an Admin Command Prompt (right click on cmd, and select run as Administrator)
* type 'sfc /scannow'
* insert vista DVD
* checks against Vista DVD.
Vista 2 screens background across multiple monitors
Many of us are Vista users with more than one screen, and we have been complaining for years about XPs lack of being able to set one big picture to span across both monitors. It has been a pain, until now. It is not a very well advertised feature of Vista, but your dreams have been answered.

* Right click on the background and select Personalization.
* Click on Desktop Background
* Select a background image that is at least as wide as the combined resolution of both of your monitors (or scale the image up so it is big enough, else you will get tiling.. it takes some tweaking
* Select the Tile picture positioning option as shown below. This is the only option that will display your background image across multiple monitors.
What do Various Areo Performance Settings do?
* Animate controls and elements inside windows:
* Activate windows when minimizing and maximizing: Controls animation effect when min/max a window
* Enable Desktop composition: Seems to only effect whether transparency is used on the desktop
* Enable transparent glass: Requires desktop composition to be enabled as well, but handles transparency
* Fade or slide menus into view: Menu animation effect enable/disable
* Fade or slide ToolTips into view:same as above with tooltips
* Fade out menu items after clicking:
* Show preview and filters in folder:
* Show shadows under menus:
* Show shadows under mouse pointer:
* Show thumbnails instead of icons:
* Show translucent selection rectangle: When selecting a group of files, whether there will be a shaded box or just a plain box.
* Show window contents while dragging:
* Slide open combo boxes:
* Slide taskbar buttons:
* Smooth edges of screen fonts:
* Use background image for each folder type:
* Use drop shadows for icon labels on desktop:
* Use visual styles on windows and buttons: Without this, you will be left with the 'classic' windows theme.. and then.. why use vista? I would say leave this alone unless you are on a very old computer or dont like the new visual styles.
How to use ReadyBoost to uh Boost yourPerformance
One of the better Windows Vista features I've seen is ReadyBoost. Despite contrary misinformation you will read on other sites, this does not add more memory to your system. The flash memory used is nowhere as fast as RAM, but it is sometimes faster than hard drives. Readyboost works by caching your pagefile on the drive. It does not replace the pagefile, it is just a cache. A faster than hard drive but slower than RAM cache. But this speed can make a difference, especially consider the slowness of many peoples hard drives.
How do I use it?:
* Plug in USB storage device.
* Go to Computer and right click on the removable storage device and select Properties.
* If your device is compatible, you will see a ReadyBoost tab. Click on that.
* Select Use this device and select the amount of space on it you want to dedicate for the ReadyBoost system file.
* Click OK and you are finished.
Some Notes:
* Will removing the drive from the computer break my computer? NO.
* What speed drive do I need? 2.5MB/sec throughput for 4K random reads and 1.75MB/sec throughput for 512K random writes.. which means just get a newer flash drive. Some drives advertise 12mb/sec but thats usually not for random access. Look for readyboost labeled drives or get ones with good reviews.
* What size drive do I need? 256MB to 4GB, where as best performance is gotten at around a 1:1 to a 2:1 flash to ram ratio. So really, you should never try this with a flash drive smaller than 1GB-2GB.
Improve SATA Performance
If you have a SATA Diskdrive, you can enable Microsoft's write caching for drives.
* Go to My Computer
* Right click on the SATA drive and go to Properties
* Navigate to the Policies tab
* Check Enable Advanced Performance
* Go to My Computer
* Right click on the SATA drive and go to Properties
* Navigate to the Policies tab
* Check Enable Advanced Performance
Speed up Aero by Disabling Minimize/Maximize
Some performance increases have nothing to do with strain on hardware, or amount of processing. Sometimes, things are designed to take longer than they should, though only maybe 1/2 a second, but the end result to the user is a faster machine. This is one of those tweaks. Minimizing and maximizing does an animation. Watch closely. Pretty quick eh? Still, it does slow you down, and, really, what does it add to your experience? I am all about vanity and aesthetics, but this feature has got to go.
Relish in the fact you will be increasing your productivity by 0.2 seconds per minimize/maximize.
* Open your start menu, go to run, and type in 'systempropertiesperformance'
* From the Visual Effects tab, uncheck 'Animate windows when minimizing and maximizing'
* While you are here, might as well check out the other goodies you can disable.
Speed up Aero with No Transparency
Want to still use Aero, but lighten up the features a little? One of the heavier aspects of Aero is the transparency (as it was with XP), so turning it off can save you a little resources.
* Right click on the desktop and select 'Personalize'
* Select 'Windows Color and Appearance'
* Uncheck 'Enable Transparency'
You still get all the other benefits of Aero, but your system should be a little less sluggish.
* Right click on the desktop and select 'Personalize'
* Select 'Windows Color and Appearance'
* Uncheck 'Enable Transparency'
You still get all the other benefits of Aero, but your system should be a little less sluggish.
Find out what is Accessing your Hard Drive
Have you ever had times when your hard drive just goes crazy with accesses and you can not see any real reason it does so? Or maybe your hard drive just start thrashing when you feel it should not be? This is usually do to some background process taking over your computer, whether indexing service or virus scan, it used to be pretty hard to track this down.
Fear not! Windows Vista has a simple tool included that can help you identify the problem and remedy it quickly.
* Open the task manager (many ways to get to it, easiest is ctrl+alt+delete then select Start Task Manager)
* Navigate to the Performance tab
* Click on Resource Monitor
* Expand the disk section and sort by either reads or writes column.
Clean out unneeded Services quickly
Windows Vista has around 130 services. True, not all of them are running, but most are set to default to run when necessary. Over half of them start up on a default machine. Your first step towards tweaking vista should be to disable services that you frankly have no need for. They are just running aimlessly.
There are two options here. You can manually go through all 129 services with the aid of our In-depth guide to help you determine if you might need a service (dependencies and what depends on a given service are listed), or you can run one of our custom Registry files which will allow you to try out several tweaked settings. Don't worry, if you mess up your services, or you don't like the results of the tweaked settings, you can always go back to the default settings with one of the handy default reg files on the same page.
Thats pretty much it. Realize that:
* Default: The service will not run on default, but if requested to by any other process, it will start up.
* Automatic:Start up this service right on computer load.
* Automatic (Delayed Start):Start up this service on computer boot, but starting it up can wait until after user is logged in. The startup of the process can be delayed/set to a lower priority.
* Disabled: The service will not run, even if requested to.
Delete Browsing History commands (IE7)
• Delete Temporary Internet Files: RunDll32.exe InetCpl.cpl,ClearMyTracksByProcess 8
• Delete Cookies: RunDll32.exe InetCpl.cpl,ClearMyTracksByProcess 2
• Delete History: RunDll32.exe InetCpl.cpl,ClearMyTracksByProcess 1
• Delete Form Data: RunDll32.exe InetCpl.cpl,ClearMyTracksByProcess 16
• Delete Passwords: RunDll32.exe InetCpl.cpl,ClearMyTracksByProcess 32
• Delete All: RunDll32.exe InetCpl.cpl,ClearMyTracksByProcess 255
• Delete All + files and settings stored by Add-ons: RunDll32.exe InetCpl.cpl,ClearMyTracksByProcess 4351.
Windows Defender: Command Line Parameters
Example: "%ProgramFiles%\Windows Defender\MSASCui.exe" -Hide -CheckForUpdates
-Hide -> hide Windows Defender window
-UpdateAndQuickScan -> Check for Updates + launch Quick Scan
-CheckForUpdates -> Check for Updates
-FullScan -> Full System Scan
-QuickScan -> Quick Scan
-ScanResults -> Scan Results window
-Settings -> Options panel
-ShowSWE -> Software Explorer
-ShowSWE:Startup -> Software Explorer @ Startup programs
-ShowSWE:Running -> Software Explorer @ Currently running programs
-ShowSWE:Network -> Software Explorer @ Network-connected programs
Large Icons on your Desktop
Click on your Desktop, press Ctrl + Scroll Up (this works in any folder).
You can make them larger then when you select Large Icons from the menu (Right Click -> View -> Large Icons).
You can make them larger then when you select Large Icons from the menu (Right Click -> View -> Large Icons).
Hidden Open Command Window Here Context Menu item
Open a folder, press Shift + Right Click -> Open Command Window Here
Disable Hibernation & delete the Hibernation file
Windows places a file on your hard drive that it uses when your computer goes into hibernation mode. If you do not use hibernation mode, or your computer does not properly support it, you may want to disable hibernation and clear the file off your hard drive to free up some space (the file will use as much space as you have in physical memory, so if you have 1GB of RAM, it’s going to use 1GB of your hard drive space).
Disable Hibernation:
1. Click Start, All Programs, and then right click on "Command Prompt".
2. From the context menu click on "Run as administrator".
3. If User Account Control prompts you to allow the action, click on Continue.
4. In the command prompt window, type "powercfg –h off" (without the quotes).
4. Close the Command Prompt window.
Delete the Hibernation File:
1. Click Start, All Programs, Accessories, System Tools, and then click "Disk Cleanup".
2. If prompted to choose a drive, select the drive in which Windows Vista is installed on to and press OK.
3. Disk Cleanup will scan the hard drive and present you with a list of options.
4. Check "Hibernation File Cleaner", and then click OK.
5. When asked "Are you sure you want to permanently delete these files?" click on the Delete Files button.
Enable the Aurora boot screen
If you are tired of the default boot screen in Windows Vista, there is a better looking one hidden away:
1) Press the Windows button, type msconfig and press Enter.
2) If User Account Control prompts you to allow the action, click on Continue.
3) In the "System Configuration" window, click on the Boot tab.
4) Select your Windows Vista installation and under "Boot options", check "No GUI boot".
Press OK.
5) In the dialog that appears, check "Don’t show this message again", and then click on Restart.
6) Your computer will now reboot, and you will see the Aurora boot screen with text that says "Starting Windows Vista".
Use BitLocker Drive Encryption without TPM chip
Windows Vista includes a new hard drive encryption feature called BitLocker Drive Encryption. BitLocker can be a very useful security feature for businesses and home users that have sensitive and confidential information stored on their computer. Unfortunately, BitLocker Drive Encryption by default requires a Trusted Platform Module (TPM Chip) version 1.2 or later installed in your computer. A lot of the computers and laptops on the market do not come with TPM chips installed since they are typically only found in premium model business computers. If you have Windows Vista Business, Ultimate or Enterprise but do not have a TPM chip, you can still use BitLocker Drive Encryption.
Hidden away in local group policy is a setting that will allow you to turn on the ability to use a USB storage device instead of a TPM key to store the encryption key. This is a great feature for users that don't have the latest high-end hardware because you can still use hard drive encryption. However, every time you turn on your computer, the USB storage device that has the encryption key located on it must be plugged in. Without it, your computer will not boot up. One BitLocker Drive Encryption is setup with a USB storage device, that USB storage device basically becomes the key to your computer.
Press the Windows button, type gpedit.msc and press Enter.
Navigate through: Computer Policy, Administrative Templates, Windows Components and BitLocker Drive Encryption. Right click on Control Panel Setup: Enable advanced startup options and select Properties.
Check Enabled and click OK.
Make User Account Control (UAC) Stop Blacking Out the Screen
Windows Vista Business/Ultimate Users:
To get to the configuration screen for this, type in security to the start menu search box.
You should see the Local Security Policy as the top search item.
In the Local Security Policy window, browse down to Local Policies \ Security Options.
Over in the right hand part of the window, scroll down near the bottom and find the item titled “User Account Control: Switch to the secure desktop when prompting for elevation”
Double-click on the item, and change it to disabled and then click OK.
Note: This does make your system slightly less secure, so be warned.
Windows Vista Home Users:
Press the Windows key, type regedit and press Enter. Browse down to this registry key:
[HKEY_LOCAL_MACHINE\SOFTWARE\Microsoft\Windows\CurrentVersion\Policies\System]
You should see a key called PromptOnSecureDesktop. Double-click this and change the value to 0
Edit the Boot Configuration Data
EasyBCD is NeoSmart Technologies' multiple award-winning answer to tweaking the new Windows Vista bootloader. With EasyBCD, almost anything is possible. Setting up and configuring Windows boot entries is simple, and there is no easier way to quickly boot right into Linux, Mac OS X, or BSD straight from the Windows Vista bootloader - on the fly, no expert knowledge needed!
Automated MBR and BCD backups, boot sector restore kits, support for a dozen+ operating systems, detailed configuration of all boot entries, and award-winning guaranteed technical support is what makes EasyBCD stand out - all for free!
Automated MBR and BCD backups, boot sector restore kits, support for a dozen+ operating systems, detailed configuration of all boot entries, and award-winning guaranteed technical support is what makes EasyBCD stand out - all for free!
Windows Media Center: Command Line Parameters
These Command Line Switches launches Windows Media Center and cause it to navigate directly to one of the built-in experiences:
%SystemRoot%\ehome\ehshell.exe /directmedia:discplayback - Begins playback of the disc in the drive
%SystemRoot%\ehome\ehshell.exe /homepage:VideoFullscreen.xml /PushStartPage:True - Live TV
%SystemRoot%\ehome\ehshell.exe /homepage:VideoGuide.xml /PushStartPage:True - TV Guide
%SystemRoot%\ehome\ehshell.exe /homepage:RecordedTV.BrowsePage.xml /PushStartPage:True - Recorded TV
%SystemRoot%\ehome\ehshell.exe /homepage:VideoToBeRecorded.xml /PushStartPage:True - Scheduled Recordings
%SystemRoot%\ehome\ehshell.exe /homepage:Radio.BrowsePage.xml /PushStartPage:True - Radio
%SystemRoot%\ehome\ehshell.exe /homepage:Radio.xml - FM Radio
%SystemRoot%\ehome\ehshell.exe /homepage:MusicBrowsePage.xml /PushStartPage:True - Music Library
%SystemRoot%\ehome\ehshell.exe /homepage:VideosBrowsePage.xml /PushStartPage:True - Video Library
%SystemRoot%\ehome\ehshell.exe /homepage:PhotosBrowsePage.xml /PushStartPage:True - Picture Library
%SystemRoot%\ehome\ehshell.exe /homepage:Options.Home.xml /PushStartPage:True - Settings Menu.
Enable Data Execution Prevention (DEP) in Internet Explorer7
Because browsers can host plug-in extensibility, security settings within the browser can make plug-ins fail. This is why in Internet Explorer 7 Data Execution Prevention (DEP) is off by default. Two of the most well-known and commonly used browser plug-ins, the Adobe Acrobat/Reader browser helper object and the Adobe Flash Player, now run when DEP is enabled. You can enable DEP by navigating to the following dialog and checking the highlighted option shown below (note, you must elevated to admin first, otherwise the option is grayed out).

Add Search Providers to Internet Explorer 7
To add a provider to the Internet Explorer 7 Instant Search box, click on the down arrow (next to the  glass) at the Search box & click on "Find More Providers". Select one of the Web Search or Topic Search provider's to add them to the list, you can add custom Search provider's in the Create Your Own section on the right.
You can switch the provider by clicking on the down arrow at the Search box -> select the provider that you want to use. The provider's are saved in the registry, I've exported some of my favorites, just merge them + restart Internet Explorer and they are added to the list.
The zip file below contains the following SearchScopes:
• deviantART - All, Digital Art, Icons, Photography, Skins & Themes + Wallpapers (find that lost wallpaper smile.gif)
• Event ID (Enter an Event ID number to get the description)
• Google & Google Image Search
• IMDb Search (Movie Database)
• Ixquick Metasearch & Ixquick Picturesearch
• MetaCrawler
• MSDN Enhanced Search
• Neowin Forums biggrin.gif
• SourceForge.net
• Wikipedia
• YouTube
glass) at the Search box & click on "Find More Providers". Select one of the Web Search or Topic Search provider's to add them to the list, you can add custom Search provider's in the Create Your Own section on the right.You can switch the
provider by clicking on the down arrow at the Search box -> select the provider that you want to use. The provider's are saved in the registry, I've exported some of my favorites, just merge them + restart Internet Explorer and they are added to the list.The zip file below contains the following SearchScopes:
• deviantART - All, Digital Art, Icons, Photography, Skins & Themes + Wallpapers (find that lost wallpaper smile.gif)
• Event ID (Enter an Event ID number to get the description)
• Google & Google Image Search
• IMDb Search (Movie Database)
• Ixquick Metasearch & Ixquick Picturesearch
• MetaCrawler
• MSDN Enhanced Search
• Neowin Forums biggrin.gif
• SourceForge.net
• Wikipedia
• YouTube
Extended Disc Cleanup
The command line parameters sageset & sagerun still work in Vista. You can set it to delete files from a previous Windows installation, error dump files, Temporary Windows installation files, Thumbnails, Files discarded by Windows upgrade, Error Reporting Files, ect. Note: It performs a Disc Cleanup on all disks.
You can use the shortcut in the attached zip file or create a new shortcut with this command line:
%SystemRoot%\System32\Cmd.exe /c Cleanmgr /sageset:65535 & Cleanmgr /sagerun:65535
Edit the shortcut (Right click and select Properties), set it to run Minimized and change the Icon to %SystemRoot%\System32\Cleanmgr.exe.
Change the Start Menu Power buttontoShutDowninsteadofsleep
Open the Control Panel and click on Power Options. Select the Power Plan that you want to use and click on "Change plan settings". Click on Change advanced power settings, double click on "Power buttons and lid". Double click on "Start menu power button", change the Setting to Shut down.
Or,.. merge PowerButtonShutdown.reg and Log off or Restart to apply changes.
Or,.. merge PowerButtonShutdown.reg and Log off or Restart to apply changes.
Switch, Change or Set 64-Bit WMP11 in Vista x64 as Default
In Windows Vista x64, the 32-bit edition of Windows Media Player 11 (WMP 11) is set as the default Windows Media Player. This is done to avoid and reduce any compatibility issues or problems that may arise with codecs or other DirectShow related plug-ins or add-ons that majority of them still built for 32-bit operating system. However, if you decide to use the 64-bit version of WMP11 with your 64bit version of Windows Vista, especially now that more and more codecs support 64-bit computing platform, and a x64 FFDShow codec which can decode virtually any audio or video media files has been released, you can use a few easy methods to launch 64 bit WMP11 or simply switch, change or swap the system default media player to x64 Windows Media Player, and revert back to x86 version when you need to.
By default, the 32-bit WMP 11 x86 is located at path of %ProgramFiles(x86)%\Windows Media Player, and 64-bit WMP11 x64 is located at folder of %ProgramFiles%\Windows Media Player. So the first method to use 64-bit Windows Media Player is by launching WMP from its x64 location.
Press the Start button, type %Programfiles%\Windows Media Player\wmplayer.exe and press Enter. Alternatively, you can create a shortcut with target and location set to the above, and place the shortcut on the Desktop or in Quick Launch for easy access.
Second method: You need to perform 2 steps each to swap to 64-bit version or to undo the change back to 32-bit version WMP. The unregmp2.exe command (first step) changes the operating system shortcuts to point to WMP 64bit, while the second registry step changes the file associations default program to WMP64-bit, which determines which program will be used when you double click on a media file.
Open an Elevated Command Prompt, type unregmp2 /SwapTo:64 and press Enter.
Then, open the Registry Editor (regedit), then navigate to the the registry key HKEY_LOCAL_MACHINE\SOFTWARE\Microsoft\Windows\CurrentVersion\App Paths\wmplayer.exe. Set the registry subkey Path to be %ProgramFiles(x86)%\Windows Media Player, and the (Default) subkey to “%ProgramFiles%\Windows Media Player\wmplayer.exe” (include quotes).
To undo the x64 change, open an Elevated Command Prompt, type unregmp2 /SwapTo:32 and press Enter.
Then, open the Registry Editor, and reset the value for registry subkey of Path and (Default).
With either one of two methods, you will have complete full x64 Windows Media Player experience.
Turn Windows Features on or off
Some programs and features that are included with Windows, such as Internet Information Services, must be turned on before you can use them. Certain other features are turned on by default, but you can turn them off if you don’t use them.
In earlier versions of Windows, to turn a feature off you had to uninstall it completely from your computer. In this version of Windows, the features remain stored on your hard disk, so you can turn them back on if you want to. Turning off a feature does not uninstall the feature, and it does not reduce the amount of hard disk space used by Windows features.
Open the Control Panel, click Programs, click Turn Windows features on or off in the Programs and Features section (see picture above). Or,.. press the Windows button, type OptionalFeatures and press Enter.

To turn a Windows feature on, select the check box next to the feature.
To turn a Windows feature off, clear the check box.
In earlier versions of Windows, to turn a feature off you had to uninstall it completely from your computer. In this version of Windows, the features remain stored on your hard disk, so you can turn them back on if you want to. Turning off a feature does not uninstall the feature, and it does not reduce the amount of hard disk space used by Windows features.
Open the Control Panel, click Programs, click Turn Windows features on or off in the Programs and Features section (see picture above). Or,.. press the Windows button, type OptionalFeatures and press Enter.
To turn a Windows feature on, select the check box next to the feature.
To turn a Windows feature off, clear the check box.
Enable or disable Secure Logon (Ctrl+Alt+Delete)
It's important to keep your computer as secure as possible. One way to do so is to enable Secure Logon so that you are required to press Ctrl+Alt+Delete to log on. Using secure logon provides an additional layer of security for your computer by ensuring that the authentic Windows logon screen appears. When secure logon is enabled, no other program (such as a virus or spyware) can intercept your user name and password as you enter it.
Open Advanced User Accounts -> Press the Windows button, type netplwiz and press Enter.
Click the Advanced tab, select the Require users to press Ctrl+Alt+Delete check box, and then click OK.
Open Advanced User Accounts -> Press the Windows button, type netplwiz and press Enter.
Click the Advanced tab, select the Require users to press Ctrl+Alt+Delete check box, and then click OK.
Generate a System Diagnostics report
Windows Reliability and Performance Monitor uses performance counters, event trace data, and configuration information, which can be combined into Data Collector Sets. You can generate a report detailing the status of local hardware resources, system response times, and processes on the local computer along with system information and configuration data. This report includes suggestions for ways to maximize performance and streamline system operation.
Open the Control Panel, click Performance Information and Tools, click Advanced Tools (Tasks pane on the left), click Generate a System Health report. Or,.. press the Windows button, type perfmon /report and press Enter.
Open the Control Panel, click Performance Information and Tools, click Advanced Tools (Tasks pane on the left), click Generate a System Health report. Or,.. press the Windows button, type perfmon /report and press Enter.
Extend the Start Menu Search functionality with Start++
Brandon Paddock (Brandon Live), who works on Search technology for Windows at Microsoft, developed a very useful add-on to Vista’s Start Menu Search box: Start++, it extends the Start Menu Search box, the Run box and the command-line with customizable commands, you can set these commands to run with administrator privileges (sudo command). You can create an alias for anything you want and export it so you can share it with other users.
Type playartist Nightwish and it performs a for music with the artist Nightwish, writes the results to a .M3U file and play it in Windows Media Player. Type g hullabaloo to for hullabaloo on Google.
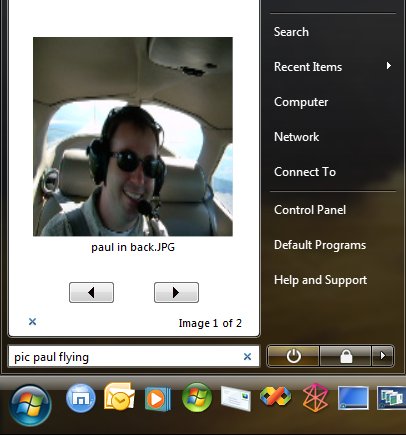
Picture Gadget ^^: Type pic into the Start Menu Search box followed by your query terms.
_________________
Type playartist Nightwish and it performs a
for music with the artist Nightwish, writes the results to a .M3U file and play it in Windows Media Player. Type g hullabaloo to for hullabaloo on Google.Picture Gadget ^^: Type pic into the Start Menu Search box followed by your query terms.
_________________
Advanced Searches & Natural Language Search
Windows will usually search for whatever you enter in the Search box by looking in the file name, file contents, and file properties of all the files in the current view. Type "Summer," for example, and it will find files named "sunset in summer.jpg," files tagged with "summer," and files written by anyone named Summer.
Vista's Search engine uses the Windows Desktop Search query syntax. If you want to search more selectively, you can filter your search by specifying which file property to search. To filter by file property, separate the name of the property and the search term with a colon, as in these examples:
kind: music artist: Sting -> Find music files from the artist Sting.
Name: Sunset -> Find only files that have the word sunset in the file name.
Modified: 05/25/2006 -> Find only files that have been modified on that date.
You can filter by any property that appears in the file list headings. To see the complete list of properties that you can filter by, right-click the heading you want to see properties for, and then click More. Using Boolean filters is another way to perform a more precise search, you can combine them with other search filters:
tropical AND island -> Find files that contain both words "tropical" and "island".
tropical NOT island -> Find files that contain the word "tropical", but not "island".
tropical OR island -> Find files that contain either of the words "tropical" or "island".
"tropical island" -> Find files that contain the exact phrase "tropical island".
(tropical island) -> Find files that contain both words "tropical" and "island", in any order.
date: > 01/05/06 -> Find files that are more than or later than a certain value, such as after 01/05/06.
size: <> Find files that are less than or earlier than a certain value, such as less than 4 MB.
Note: When you type Boolean filters like AND or OR, you need to use all capital letters!
If you turn on Natural Language Search, you can perform searches in a simpler way, without using colons and without the need to enter AND and OR in capital letters. For example, compare these searches:
Without natural language: kind: music artist: (Beethoven OR Mozart)
With natural language: music Beethoven or Mozart
To turn on Natural Language Search: Open the Control Panel, click Appearance and Personalization, click Folder Options, click the Search tab, select the Use natural language search check box, click Apply and then click OK.
Enable support for 4GB of RAM (or more) in Vista 32-bit
On a computer that has 4 GB of RAM, the System Properties dialog box and the System Information dialog box may report less memory than you expect. This problem occurs because the address space is limited to 4 GB in a 32-bit hardware environment. Memory may be relocated to make room for addresses that the basic input/output system (BIOS) reserves for hardware. However, because of this limitation, Windows Vista cannot access memory that is relocated above the 4 GB boundary.
Solution: Open an elevated Command Prompt, type BCDEdit /set pae ForceEnable and press Enter.
The pae parameter enables Physical Address Extension (PAE). On 32-bit versions of Windows, PAE is disabled by default. PAE is an addressing strategy that uses a page-translation hierarchy to enable systems with 32-bit addressing to address more than 4 GB of physical memory. PAE also supports several advanced system and processor features, such as Data Execution Prevention (DEP; "No execute"), Non-Uniform Memory Architecture (NUMA), and hot-add memory, so it is also used on computers with less than 4 GB of memory. PAE must be supported by the processor.
On a computer that supports hardware-enabled Data Execution Prevention (DEP), PAE is automatically enabled when DEP is enabled and automatically disabled when you disable DEP. To enable PAE when DEP is disabled, you must enable PAE explicitly: Open an elevated Command Prompt.
Type BCDEdit /set nx AlwaysOff & BCDEdit /set pae ForceEnable and press Enter.
Repartition a hard disk by using the Shrink feature
Note: Backup Operator or Administrator is the minimum membership required to complete the actions below.
Caution: If the partition is a raw partition (that is, one without a file system) that contains data (such as a database file), shrinking the partition may destroy the data! For detailed information, open Disk Management, click Help on the menu bar, click Manage Basic Volumes, and then click Shrink a Basic Volume.
Shrink an existing partition to create new unallocated space, from which you can create a new partition:
Open the Start Menu, right-click on Computer, click Manage, expand Storage & select Disk Management.
Right-click a partition, select Shrink Volume, Enter the amount of space to shrink in MB & click Shrink.
Right-click the new unallocated space, click New simple volume, click Next, Enter the Simple volume size in MB, click Next, assign a drive letter, click Next, Enter the Volume label, click Next, and then click Finish.
Shell Commands for Windows Vista
The shell: command can be used to open a special folder directly from the Start, Search menu. For example, the command shell:SendTo opens the SendTo folder (%UserProfile%\AppData\Roaming\Microsoft\Windows\SendTo). To launch the Documents folder of your User Profile, you'd type shell:Personal. Below is a complete shell: commands listing for Windows Vista. The entire listing is stored in the following registry key in Windows Vista:
[HKEY_LOCAL_MACHINE\SOFTWARE\Microsoft\Windows\CurrentVersion\explorer\FolderDescriptions]
shell: commands for Windows Vista:
shell:AddNewProgramsFolder - shell:Administrative Tools - shell:AppData - shell:AppUpdatesFolder - shell:Cache - shell:CD Burning - shell:ChangeRemoveProgramsFolder - shell:Common Administrative Tools - shell:Common AppData - shell:Common Desktop - shell:Common Documents - shell:Common Programs - shell:Common Start Menu - shell:Common Startup - shell:Common Templates - shell:CommonDownloads - shell:CommonMusic - shell:CommonPictures - shell:CommonVideo - shell:ConflictFolder - shell:ConnectionsFolder - shell:Contacts - shell:ControlPanelFolder - shell:Cookies - shell:CredentialManager - shell:CryptoKeys - shell:CSCFolder - shell:Default Gadgets - shell:Desktop - shell:Downloads - shell:DpapiKeys - shell:Favorites - shell:Fonts - shell:Gadgets - shell:Games - shell:GameTasks - shell:History - shell:InternetFolder - shell:Links - shell:Local AppData - shell:LocalAppDataLow - shell:LocalizedResourcesDir - shell:MAPIFolder - shell:My Music - shell:My Pictures - shell:My Video - shell:MyComputerFolder - shell:NetHood - shell:NetworkPlacesFolder - shell:OEM Links - shell:Original Images - shell:Personal - shell:PhotoAlbums - shell:Playlists - shell:PrintersFolder - shell:PrintHood - shell:Profile - shell:ProgramFiles - shell:ProgramFilesCommon - shell:ProgramFilesCommonX86 - shell:ProgramFilesX86 - shell:Programs - shell:Public - shell:PublicGameTasks - shell:Quick Launch - shell:Recent - shell:RecycleBinFolder - shell:ResourceDir - shell:SampleMusic - shell:SamplePictures - shell:SamplePlaylists - shell:SampleVideos - shell:SavedGames - shell:Searches - shell:SearchHomeFolder - shell:SendTo - shell:Start Menu - shell:Startup - shell:SyncCenterFolder - shell:SyncResultsFolder - shell:SyncSetupFolder - shell:System - shell:SystemCertificates - shell:SystemX86 - shell:Templates - shell:TreePropertiesFolder - shell:UserProfiles - shell:UsersFilesFolder - shell:Windows.
Customize / hide the Favorite Links list
The Navigation Pane is divided into two sections: Favorite Links & Folders.
The Favorite Links contains links to commonly used folders and savedes.
You can add new links by dragging folders and/or savedes into the list.
You can also drag folders from the Folders list to the Favorite Links section.
This is a convenient way to quickly access folders andes you use often.
You can reposition a link by dragging it to the position where you want it to be.
To remove a link from the list, right-click on the link and select Remove Link.
Restore default links: right-click a blank area and select Restore Default Favorite Links.
Hide Favorite Links: drag the Folders list to the top of the Navigation Pane (see picture).

The Favorite Links contains links to commonly used folders and saved
es.You can add new links by dragging folders and/or saved
es into the list.You can also drag folders from the Folders list to the Favorite Links section.
This is a convenient way to quickly access folders and
es you use often.You can reposition a link by dragging it to the position where you want it to be.
To remove a link from the list, right-click on the link and select Remove Link.
Restore default links: right-click a blank area and select Restore Default Favorite Links.
Hide Favorite Links: drag the Folders list to the top of the Navigation Pane (see picture).
Resize the Details Pane
Right-click on an empty part of the Details Pane and select one of the sizes:

Enable Advanced Disk Performance
When enabled, the hard disk drive operates in write-back cache mode, in which all the data that gets written to the drive is first stored in the cache, and then later written to the disk. Both writes and reads are cached in this case. When disabled, the HDD operates in write-through cache mode, in which all data that gets written to the drive is immediately written to the disks and also stored in the cache. Writes are not cached, but reads are.
Note: This setting is recommended only for disks with a backup power supply, it further improves disk performance, but it also increases the risk of data loss if the disk loses power.
Open Device Manager, expand Disk drives, right-click on a Disk drive, click Properties, click the Policies tab, select the Enable advanced performance check box, and then click OK.
Vista Orb Clock for Windows Sidebar


This gadget contains 12 skins based on the icons and logo from Windows Vista: 5 Vista Orbs, Windows Media Center, Windows Live, Windows Media Player, a CD, 2 Globes & the blue compass from Guided Help.
Tip: You can drag the gadgets to you desktop and use them as Desktop Gadgets (like AveDesk & Samurize).
When you right click on the Sidebar and select close, the Sidebar minimizes to the system tray & the Desktop Gadgets are still on the desktop.
Take Ownership Context Menu Item
TakeOwn.reg adds a Take Ownership Context Menu Item to all files and folders. It opens an Elevated Command Prompt which recovers full access to the selected file / directory, sub directories and their content.
You can access the Context Menu Item by holding down Shift + right-click on a file or folder.

If you want to access the Take Ownership Context Menu Item on an exe file, you must merge "RunAsAdmin_Exe-.reg"; this reg file removes the "Run as Administrator" Context Menu Item from all exe files (they both use the runas key). Merge "RunAsAdmin_Exe+.reg" if you want to restore the "Run as Administrator" Context Menu Item.
Install: Merge TakeOwn+.reg
Uninstall: Merge TakeOwn-.reg
You can access the Context Menu Item by holding down Shift + right-click on a file or folder.
If you want to access the Take Ownership Context Menu Item on an exe file, you must merge "RunAsAdmin_Exe-.reg"; this reg file removes the "Run as Administrator" Context Menu Item from all exe files (they both use the runas key). Merge "RunAsAdmin_Exe+.reg" if you want to restore the "Run as Administrator" Context Menu Item.
Install: Merge TakeOwn+.reg
Uninstall: Merge TakeOwn-.reg
Deleting the Undeletable
As many of us move forward from Windows XP or prior beta versions of Windows Vista to the final RTM version, I thought this little tip might be in order. You may be aware that Windows Vista includes a number of different ways to upgrade a computer, from a straight in-place upgrade (insert CD, run setup and choose upgrade) to Windows Easy Transfer, which allows you to copy settings, programs and data from an old setup a fresh shiny new OS environment. In doing this, it's not unusual to find some folders that can't be accessed, even by an administrator, because their ACLs were set for accounts with SIDs that applied to an old partition.
How do you take it back? -> The secret lies in two command-line utilities, one ancient, the other completely revised for this release. Respectively, these are take own (which takes ownership of a file or directory) and icacls (which sets new ACLs on that directory). I created a small batch command on my system called itsmine.cmd, as follows:
takeown /f %1 /r /d y
icacls %1 /grant administrators:F /t
From an elevated command prompt, you can run a command such as itsmine D:\hard_to_delete and this will reset ownership and ACLs on the hard_to_delete directory such that a command like rd /s D:\hard_to_delete should work.
Convert web widgets into gadgets for Windows Sidebar
With Amnesty™ Generator you can convert millions of web widgets, games and videos – designed to live on home pages, blogs or MySpace – into gadgets for your Sidebar.

Key Features:
• Create gadgets without coding experience
• Autofill feature does the work for you
• Inline step-by-step instructions included
• Supports Flash widgets, games and video
Key Features:
• Create gadgets without coding experience
• Autofill feature does the work for you
• Inline step-by-step instructions included
• Supports Flash widgets, games and video
Customize the appearance of Windows Sidebar
Windows Sidebar Styler is an application designed to allow users to tweak the Sidebar’s User Interface.
Custom styles allow users to customize the appearance of Windows Sidebar so that it fits the style of other UI elements, such as the Aero Glass colorization or third party themes.
You can save your visual styles and share them with other users.

Windows Sidebar Styler also adds support for WPF Gadgets; Gadgets now take full advantage of Windows Presentation Foundation - a powerful managed code-oriented framework for presenting rich visual compositions such as vector graphics, 3D drawing, animations and more.
Original: Minimalistic Style:
The visual styles below remove the grey Panel background, the "Add Gadgets" button + the Close, Config & the Gripper buttons that appear when you hover over the Gadgets (see image above). You can still access these functions in the right click menu from the Sidebar & Gadgets. The MinimalistiClear Style also removes the backgrounds.
Custom styles allow users to customize the appearance of Windows Sidebar so that it fits the style of other UI elements, such as the Aero Glass colorization or third party themes.
You can save your visual styles and share them with other users.
Windows Sidebar Styler also adds support for WPF Gadgets; Gadgets now take full advantage of Windows Presentation Foundation - a powerful managed code-oriented framework for presenting rich visual compositions such as vector graphics, 3D drawing, animations and more.
Original:
Minimalistic Style: The visual styles below remove the grey Panel background, the "Add Gadgets" button + the Close, Config & the Gripper buttons that appear when you hover over the Gadgets (see image above). You can still access these functions in the right click menu from the Sidebar & Gadgets. The MinimalistiClear Style also removes the backgrounds.
UltiMouse Task Controller
This program turns the Mouse into a Task Controller without losing the default functionality of the Mouse Buttons.
Double Click Middle Mouse Button -> Window Switcher (Flip3D)
Back Button + Scroll Up/Down -> Cycle through programs on the Taskbar*
Middle Mouse Button + Scroll Up/Down -> Cycle through Sidebar Gadgets * NEW *
Back Button + Middle Mouse Button -> Up One Level (emulates the Up Button)
Forward Button + Scroll Up/Down -> Maximize/Restore selected program/window
Forward Button + Middle Mouse Button -> Close selected program/window
Middle Mouse Button + Back Button -> Minimize selected program/window
Middle Mouse Button + Forward Button -> Restore last Minimized program/window
Double Click Back Button -> Minimize All
Double Click Forward Button -> UnMinimize All
* When you release the Back Button, the selected program/window is activated.
Install: Copy UltiMouse.exe to anywhere you want and create a shortcut in the Startup folder.
It runs hidden in the background, you can close it with Task Manager.
Keyboard shortcuts
Ctrl+Shift+Esc -> Task Manager (Ctrl+Alt+Del -> Tasks Screen)
Ctrl+Shift+Enter -> Run an executable with elevated privileges
Windows logo key+1-0 -> Launch the shortcuts on the Quick Launch toolbar
Windows logo key+T -> Cycle through programs on the taskbar
Windows logo key+Tab -> Cycle through programs on the taskbar by using Flip 3-D
Ctrl+Windows logo key+Tab -> Use the arrow keys to cycle through programs on the taskbar by using Flip 3-D
Windows logo key+Spacebar -> Bring all gadgets to the front and select Windows Sidebar
Windows logo key+G -> Cycle through Sidebar gadgets
Windows logo key+X -> Open Windows Mobility Center
Open a folder and press & release Alt -> Show Menu Bar (also works in Internet Explorer).
Remove the arrow (Shortcut Overlay) without side effects
Most Tweak programs remove the arrows by renaming or removing the IsShortCut String Values from the registry. Windows uses this value to track links, if you remove or rename the IsShortCut value lots of programs and features that use links won't work correctly -> in Vista the shortcuts in Favorite Links, Media Center and in the Games Explorer disappear or won't work anymore.
The files in the zip file below remove the arrows the same way as TweakUI does in previous Windows versions; it refers the icon to another icon. If you refer it to a completely blank icon, the overlays turn black when you restart Explorer or Log Off and Log On again. Solution: I've created a blank icon with some transparent pixels and with the same sizes as the default arrow -> no more arrows & no black overlays. smile.gif
Install: If you used a program or a reg file that removed the IsShortCut values; merge RestoreArrow.reg to restore them. Copy Blank.ico to the Windows directory from Vista, so if you installed Vista on the D drive, copy it to D:\Windows\. Merge RemoveArrow.reg and Log Off or Restart your Computer.
Windows Vista 64-bit users: Merge RemoveArrow_[C].reg if you installed Vista on your C drive, Merge RemoveArrow_[D].reg if you installed Vista on your D drive. If you installed Vista on another drive, just edit one of the RemoveArrow_[X].reg files so that it points to the Windows directory of Vista.
Uninstall: Merge RestoreArrow.reg and remove Blank.ico from your Windows directory.
Log Off or Restart your computer.
Closing Error Reporting (Win XP)
Error reporting, what is it and why does Microsoft want you to have it on? Basically whenever your computer crashes Win XP makes a little report of what went wrong and then sends it to Microsoft so they can improve the Windows Operating System. Generally it sounds like a nice idea, but do you really want to be sending reports about your computer to Microsoft? I personally don't and they allow you to shut off this feature. Here's how you do it:
1. Open your control panel
2. Click on Performance and Maintenance
3. Then click on System
4. Go to the Advance Tab
5. Click on the Error Reporting button at the bottom
6. Select Disable Error Reporting
7. Click the "But notify me when a critical error occurs"
8. Click Ok Twice.
1. Open your control panel
2. Click on Performance and Maintenance
3. Then click on System
4. Go to the Advance Tab
5. Click on the Error Reporting button at the bottom
6. Select Disable Error Reporting
7. Click the "But notify me when a critical error occurs"
8. Click Ok Twice.
How can I change the Registered Owner information in Vista?
Note: The information provided below contains Windows Registry changing information. Be sure that you create a restore point prior to making any changes. This will create a backup of your registry.
1.Go to Start
2.Select Run. Type in: regedit [Enter] or click OK
3.Navigate to the following registry key:
HKEY_Local_Machine\Software\Microsoft\WindowsNT\Current Version
4.Single left click the "Current Version" entry to empty its contents in to the right pane
5.In the right pane, locate the entry titled: Registered Owner
6.Right click the Registered Owner entry and select Modify
7.Edit the "Value data" textbox to enter your personal Registered Owner name
8.Click OK and close the Windows Registry.
Can I keep Vista from automatically defragging my system?
1.Go to Start
2.Select Control Panel
3.Select System and Maintenance
4.Select Performance information and Tools
5.Select Advanced Tools
6.Select Open Disk Defragmenter (continue through any UAC prompts)
7.Untick the radio button titled: Run On A Schedule (Recommended)
8.Select OK.
2.Select Control Panel
3.Select System and Maintenance
4.Select Performance information and Tools
5.Select Advanced Tools
6.Select Open Disk Defragmenter (continue through any UAC prompts)
7.Untick the radio button titled: Run On A Schedule (Recommended)
8.Select OK.
How can I disable the notification window?
To disable the Notification Balloon tips, follow the instructions below:
Note: This method requires making a change to the Windows registry. I recommend manually creating a restore point prior to making any changes in case an editing error is made.
1.Go to Start
2.Select Run
3.With the run command window open, type in: regedit.exe
4.Press Enter on your keyboard or click OK
5.In the Windows registry, navigate to the following key:
HKEY_CURRENT_USER\Software\Microsoft\Windows\CurrentVersion\Explorer\Advanced
6.Single left click the "Advanced" registry entry to empty its contents in to the right pane.
7.Right click an empty area of the right pane and select New>> DWORD Value.
8.In the DWORD textbox, type in: EnableBalloonTips
9.Once this new REG_DWORD is created, double click it.
10.In the "Value data" textbox, enter the number 0.
11.Click OK
12.Exit the Windows Registry
You may have to reboot your system for this to take effect.
How can I get Vista to Automatically log me on?
1.Go to Start
2.In the Search box, type in: netplwiz
3.Press Enter on your keyboard
4.Uncheck the entry titled: Users must enter a user name and password
5.Click Apply
6.Click OK twice to exit.
From now on, when you reboot, you will not see the login screen.
2.In the Search box, type in: netplwiz
3.Press Enter on your keyboard
4.Uncheck the entry titled: Users must enter a user name and password
5.Click Apply
6.Click OK twice to exit.
From now on, when you reboot, you will not see the login screen.
How to Maintain a Computer System?
* If you use your computer more than a few hours per day, we suggest you not to turn off your computer at the end of the day. Instead turn off only the monitor to save electricity. Daily power up and down makes the components exposed to high and low temperature cycles that are not good for the life-time of the components, particularly the critical ones such as hard drives, CPU, and memory. The temperature cycle would result in expansion-shrinking cycle for the components. The life-time of electronic components would be increased if they are run at constant temperature with adequate ventilation.
* If your area experiences a few times of power outage per year, it is necessary to use a UPS. Sudden power downs while the system is running may cause severe damage to hard drives.
* A tape backup and a lock to make systems hard to move are worthy investment for critical data.
* Use your hand to touch and feel the cover of your computer at least once a week. The cover should be at room temperature. If it feels warm there may be a problem! Check to make sure that the cooling fans on the power supply and CPU are working properly. Clean the air pathway on the back of the power supply on a regular basis.
How to Troubleshoot the Computer?
1. Trial and error: When you find a faulty component in your computer, first of you check it with the other computers so that you can make sure whether the fault is in the component or not.
2. Check cables: In case of any device failure, check all the cables of your computer such as data cables, power cable, internal circuitry cables etc and make sure that all the cables are plugged in and working fine.
3. Hardware settings: Check the hardware settings in the CMOS and in the device manager of the system and make all the device drivers and up to date and all the cards are plugged in properly.
4. Notice changes: When you notice a software or hardware error in your computer, determine what was changed before the problem occurred.
5. Event viewer: Use the event viewer utility by going to Start > Control panel > Administrative tools > Event viewer. In the event viewer you will find the error or warning messages associated with any faulty hardware or software.
6. Make notes: Troubleshooting is big learning option and we can learn a lot when we face any kind of troubleshooting in our computer. Make notes including the error messages and their solutions, so that you have a record that how a certain problem occurred and how did you solve it.
"Error on Page" when attempting to add an attachment in Web
When trying to add an attachment to an assignment or discussion message in WebCT Vista or CE 6, some users have reported seeing an "Error on Page" message in their browser.
There are a number of possible causes for this error; most can be resolved by following WebCT's Browser Tune-Up instructions.
* Ensure that the document you are trying to upload is not open in another program on your computer. For example, if you want to upload a Microsoft Word document, save and close the document first.
* If using the Internet Explorer browser, ensure that the "Display a notification about every script error" option is not checked:
1. In Internet Explorer, from the Tools menu, select Internet Options
2. Click the Advanced tab
3. Scroll down and uncheck Display a notification about every script error
4. Click OK to save your changes
WebDAV and Folder is Invalid Errors
When trying to access a folder in WebCT Vista using the WebDAV client in Microsoft Windows 2000 or XP, some users have reported getting an error message saying that the "folder is invalid".
This can be caused by some Microsoft Windows WebDAV clients that encode the path that the user enters, including changing the plus sign (+) to %2B. These WebDAV clients may have been updated by installing Microsoft Office XP/2003. The original WebDAV client that shipped with Windows 2000 and XP does not encode the plus sign (+) in the path, so it works with WebDAV paths in WebCT Vista.
On the affected client computer, re-install the original WebDAV client for Microsoft Windows.
1. Find the file: webfldrs.msi
The location of the file depends on the version of Windows that you are using.
For example, on Microsoft Windows XP:
- This file is normally found under \WINDOWS\SYSTEM32\webfldrs.msi
- If you installed Windows XP Servicepack 1 you will find it under \WINDOWS\ServicePackFiles\i386\webfldrs.msi
For example, on Microsoft Windows 2000:
- This file is normally found under \WINNT\system32\webfldrs.msi
2. To start the installation, double-click webfldrs.msi
3. Click "Select reinstall mode".
4. Uncheck "Repair all detected reinstall problems".
Check "Force all files to be reinstalled, regardless of checksum or version".
Check "Verify that required user registry entries are present".
Check "Verify that required machine registry entries are present".
Check "Validate shortcuts".
5. Click OK and REINSTALL.
6. Reboot your computer.
Search Toolbars and Session Already Running Errors
When trying to access WebCT Vista, some users have reported getting "Session Already Running" error messages.
Some users found that this problem could be resolved by changing an Internet Explorer setting:
1. In Internet Explorer, from the Tools menu, select Internet Options.
2. Click the Advanced tab.
3. Under Browsing, clear the checkbox for Show friendly HTTP error messages.
4. Click OK.
5. Restart the Internet Explorer browser.
Search toolbars may cause this problem. Users have reported that this problem could be resolved by uninstalling search toolbars from Yahoo!, mySearch, AltaVista, Google, and other sites.
You may be able to uninstall a toolbar through the Windows Control Panel:
1. From the Start menu, select Settings, Control Panel
2. Double-click Add/Remove Programs
3. Locate the search toolbar, and click Change/Remove
4. Follow the onscreen instructions.
For more information on uninstalling a program, refer to its documentation.
HTTP 403 Forbidden or Access Denied Errors
When trying to log into WebCT, some users have reported getting "403 Forbidden" or "Access Denied" error messages.
One possible cause is an Internet Explorer 6 update installed by Windows Update. Some users found that this problem could be resolved by changing an Internet Explorer setting:
1. In Internet Explorer, from the Tools menu, select Internet Options.
2. Click the Advanced tab.
3. Under Browsing, clear the checkbox for Show friendly HTTP error messages.
4. Click OK.
5. Restart the Internet Explorer browser.
If this problem persists after changing this setting and restarting your browser, it may be caused by spyware or deceptive software on your computer.
Green screen and code like "); d.writeln(" ");
When trying to access a course after logging into WebCT, some users have reported getting a green screen and code like "); d.writeln(" "); displaying in their browsers instead of the WebCT course.
It has been reported that this can be caused by the RX Bar (Search Engine Bar) that can be installed when you install peer-to-peer file sharing applications like Kazaa.
Users have found that this problem can be resolved by uninstalling the RX Bar.
1. In Microsoft Windows, open the Control Panel.
2. Open Add or Remove Programs.
3. Find the entry for RX Bar, then click Change/Remove.
4. If prompted, confirm that you want to remove the program.
5. Restart your computer.
Sun Java Runtime Environment Errors
Some users have reported problems using WebCT with Microsoft Windows and some versions of the Sun Java Runtime Environment (JRE).
Possible causes include using an incompatible version of Sun JRE or having multiple versions of Sun JREs installed. Some users have found that their problems are resolved after uninstalling all versions of Sun JRE from their computers, and then installing an earlier version, like Sun JRE 1.4.2_09.
1. From the Start menu, select Settings, Control Panel.
2. Double-click Add/Remove Programs.
3. Locate all versions of Sun Java, JRE, or JVM.
4. For each version, click Change/Remove and follow the onscreen instructions.
5. Download Java.
6. To install the JRE, accept the license agreement and follow the online and onscreen instructions.
After installing the JRE and rebooting your computer, do not download updates for the JRE. Disable automatic checking for Java updates:
1. From the Start menu, select Settings, Control Panel.
2. Double-click Java Plug-in.
3. Click the Update tab.
4. Clear the checkbox next to Check for Updates Automatically.
5. Click Apply.
6. Click the "x" to close the Java Plug-in Control Panel window.
Subscribe to:
Posts (Atom)